Tuesday, August 12, 2014

Hemlock Street Part 4 - The Bakery | 2 Comments - Click Here :


Keith Hayes - Dunn’s Buns started life as a Banta Silver Plume Bakery kit. I followed the directions to build this model. The fancy cornice and storefront with large windows makes this building an eye catcher. I was careful to pre-paint all the siding and painted the storefront trim to contrast with the toasty (pun intended) color of the siding. The prototype is on a hillside that slopes down to the rear from the street; my site sloped in two directions.
    Fortunately, Tom Troughton published an article on the web describing how he builds platforms. Tom starts with a piece of tempered hardboard cut a bit smaller than the platform size; he drills holes for the posts and inserts square stock for the legs. Strip wood is glued to the hardboard to create the deck, and some trim applied to the edge to create the frame. Banta steps and some cross bracing finished the front end of the building.
    With the platform built, the rear of the building was still up in the air. This part of the building is too close to the front of the layout for carved foam to suffice. Years ago, I got some air-formed plastic in a stone pattern, and I considered this for the foundation, but the pattern seemed a little large and rough. So, when I saw some Chooch peel-n-stick stone, it fit the bill. The Chooch stone comes in several patterns and sizes, and I selected a smaller stone in a random stack for the foundation.
    A fancy store like this called for a special sign. I could not find any large letters with drop shadows, the black outline below the white letters, but I was able to locate some dry transfer (or press type) that were both in black and white. I got some decal film, and started using the black letters, laying out two sets of each word I needed. Then, I followed with white letters, carefully placing them slightly up and to the left. Last, I gave the decals a couple coats of dull coat and the signs were ready.

I had gotten the Banta kit a while back, as it is a neat model with some fancy cornice detail. The prototype is on a hillside with the rear of the building exposed. As I was planning Hemlock Street, I was inspired by the prototype when I developed the model site contours.

The storefront and cornice detail is accomplished with a couple assemblies--the trim over the siding below. Everything is peel-n-stick, so I built the trim piece up as an assembly and finished everything with a coat of white paint. The siding is--appropriately--a toast color.

Dunn's Buns (pies and cakes) is named after a good friend. I figured it needed some neat drop shadow lettering within the trim on the false front. I have shared that finding large type is getting difficult. I was able to find some Roman type dry transfers in both black and white, and some gothic for the smaller lettering. I created the drop shadow by lettering the black first on decal paper, then adding the white on top with a clear coat to seal the works. Note that the two sides of the model are different, so the two signs have different letter spacing. This was a great way to get a custom sign without a bunch of fuss.

Initially, I planned to use embossed plastic brick sheet for the foundation. Durning construction, I discovered the excellent peel-n-stick stone sheet manufactured by Chooch. This comes in a variety of patterns and several sizes. This is the smaller size in a random stone pattern. I painted some of the stones an accent color. The corner is mitered and this shows the wall before I peeled the sheet off the back to adhere it to the foam. Eventually a trim board will cover the joint at the floor. Oh yeah, every one of those battens is individually applied.

Keith Hayes
Leadville in Sn3

Saturday, August 9, 2014

Roper's Snapshot Saturday No.12 | 14 Comments - Click Here :

Denver Public Library

Friday, August 8, 2014

Denver Ice | 2 Comments - Click Here :


    As an FYI, anyone interested in the history of ice plants served by the C&S, you may wish to read the fabulous information provided by Derrell Poole, which he posted as comments on Roper's previous snapshot blog. You can find the link here: Ropers Snapshot Saturday No. 11

    I will probably take all his comments and post them as one big blog article once Roper's snapshot series on icing is complete. For now, make sure you follow along by clicking on the comments headers.

Hemlock Street Part 3 - More Houses | 2 Comments - Click Here :

Suzanne and her friend Janine enjoy a cool beverage on Suzanne's porch while they wait for their husbands to come home from the mines. These are HO figures on the porch of an HO house; the figures at the bottom of the image are S scale. What do you think?

    Keith Hayes - The Leadville image featured rows of shotgun houses, so called because you could stand at the front door with a shotgun and shoot it though the back door through each of the successive rooms. Leadville homes often were distinguished by a bay window. Though I found a number of kits that filled the bill, I still needed to make some homes to fill the gap. Shotgun houses tend to be much longer in life than the models available
    A Grandt kit filled the bill for one of the houses—No Problem Joe’s.  This house worked in the center of the scene. I still needed a house behind the grocery. Grandt also offers “grab bags,” packages of random architectural details which are great for projects like these: it is like a starter kit for your scrap box. I had a couple grab bags on hand, and got some styrene sheet out. I laid out the gable ends, found a nice front door and studied the windows to figure out which ones could be combined to make a bay window. The selected windows were glued together with styrene shapes at the corners, which doubled as bracing and trim: voila! a bay window.
    For another house, I went back to the N scale Grandt kits and glued two wall sides together to create a longer shotgun. The Reese Street kits also have some shed additions, and I used these to add to some of the other kits I built to add some variety to the rear of the houses that would face the room. I glued a couple together to create an outbuilding. The Reese Street kits also include some outhouses, and these were painted to match their houses.
    The houses feature a variety of roof covering. I used the cast wood shingles for a couple. Others had a rolled roof. I also got some Wild West shingles in several scales and colors and applied them following the directions. Oh, I did use a Sharpie to paint the roof edges and ridge black prior to applying the shingles.
    When I laid out the street in foam I also made the home lots. As I was contouring the foam, I placed the houses and carved the foundations. To provide some variety, some of the foundations are smooth to simulate concrete; for other buildings I carved in lines and painted the foam to look like stone.

Working like a developer, I cut the lot for each home out as an individual. Leadville lots were 15' x 105'. I shimmed the top to the right level, and cut the foam to match the outline of the house. Depending upon how much of the foundation would be visible, I also textured the foundation to simulate either stone or concrete. The 'wedge' shape of the street is clear here too.

All the foam lots have been glued together, painted and a layer of sand applied. Where the joints did not line up, I applied Matte Medium to smooth out the unruly joints and make final adjustments. This was followed by more tan latex paint and a gentle sprinkling of sand.

The houses are lined up behind Carleno's Grocery. The first two on the left are scratch built; the next two are Grandt models in HO and N respectively and the model to the right is an N or Z scale laser cut wood model of a shotgun house. You can see even from this angle the visual deception works.

I decided that the N scale Grandt kit was too short in plan, and glued two kits together to make a longer house. I added a Wild West Models corrugated roof. Suzanne's house (second from left) is getting a Wild West shingle roof. I used a wide tip Sharpie to blacken the roof edge before applying the shingles.

Keith Hayes
Modeling Leadville in Sn3

Saturday, August 2, 2014

Roper's Snapshot Saturday No.11 | 8 Comments - Click Here :


John Maxwell Photo

John Maxwell Photo

ICC Maps of Denver

Denver Public Library

Monday, July 28, 2014

Hemlock Street Part 2 - Selecting Models | 6 Comments - Click Here :


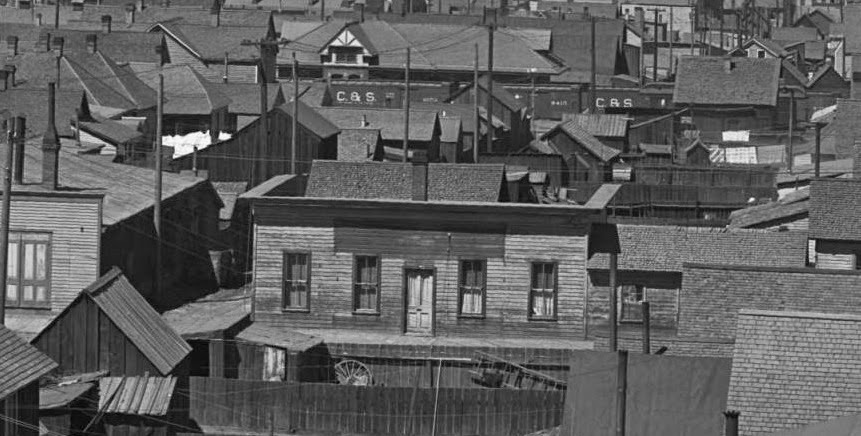
    Keith Hayes - A side benefit of this scene was the opportunity to build some neat laser cut kits in HO and N scale. So, back to the hobby shop in search of appropriate kits. I found a couple small home kits and neat industries from LaserKit and Bar Mills. I started building models and mocking them up along the street to see what worked. I already had a Banta Silver Plume Bakery kit. The prototype bakery is on a corner, and has a great false front with a complicated cornice. This kit was to anchor one corner. For the opposite corner, I went back to the photo—there was a great, simple commercial building right there in the middle screaming to be modeled.
    The building form was simple, and Grandt had a number of castings that fit the bill. I used Evergreen styrene lap siding to make the front, side and rear. The cornice is built up from strip stock and dowel. I was pondering how to build the walk in front of the building, and I spotted a web article published by Tom Troughton. Tom recommended building loading docks on a piece of hardboard. You drill holes for the posts, and glue stripwood to the top—perfect!
    The building in the photo has no sign to indicate its use, though it has a large black patch above the door for a sign. A grocery seemed the ticket at the end of the residential street, and extending the platform to the track provided a nice opportunity for rail service. Bar Mills has a neat kit, Four-Fingered Tony’s, which provided the window signs, and many castings to fill out the platform with vegetables. Our friend Tom Carleno obliged us with his name and Carleno’s Grocery was complete.

Laying out the front wall using Evergreen lap siding and Grandt Line windows. Being in the foreground, this building is built full scale; 1:64.

I use spare parts as gussets to square the inside corners. There is a large door on the track side. The rear wall faces away from the viewer, so there was no need to add any openings. It will be on the lot line anyway.

I did not enlarge the prototype image much, but it seemed like the building had a nice cornice. You could see the inside face of one side of the parapet, so I added lap siding there, and a wide piece of styrene as a cap. I added a tall vertical leg, then a piece of rod and a smaller piece below that: the whole bunch creates a satisfying effect. Some Squadron putty fills the holes.

The building in the photo does not have a sign, but there is a black panel where one was painted. I painted the siding yellow with a nice green trim. I masked patch and painted it black for the sign. I looked all through the letter decal sets at Caboose Hobbies one day, and settled on this Gothic font (one challenge in larger scales, is the lack of large fonts for signs like this). I used my computer to layout the sign spacing, and taped this on the building for reference.

If you look closely at the McClure photo, you will see all the buildings have a stain at the bottom three feet of the walls. I suspect this is due to long winters and melting snow setting against the bottom of the buildings. Some charcoal rubbed on the bottom of the building duplicated the effect nicely. This image also shows the deck I built following Tom Troughton's tips; more on that another time.

Keith Hayes
Modeling Leadville in Sn3

Wednesday, July 23, 2014

Hemlock Street Part 1 - Inspiration | 5 Comments - Click Here :


    Keith Hayes - Every layout has a corner, and mine is no exception. Usually, the outside of a broad curve  is the site of a hillside or pasture, or an occasional industry. Adding more track or an industry is always a temptation. When planning my layout, I don’t know that I had anything specific in mind for my corner condition. Then, I saw the photo; In about 1915, George L. Beam journeyed to Leadville and took some photos of town looking west. In the foreground are the residential neighborhoods that stretch downhill from the mines on Carbonite Hill towards the C&S depot and Harrison Street. The streets are lined with shotgun houses with board walks and picket fences in front. What a great scene. My corner problem was solved!

Hemlock Street homes being delivered at Leadville.

    About this time, I was wandering in the HO kit aisle of Caboose Hobbies and spied the Grandt Line Gold Belt kits. These are some neat styrene models of small homes and mines available in HO and N. I bought the Reese Street Row Houses, and quickly assembled a couple with the intent to modify them with S scale windows and doors. On a whim, I bought the N scale Reese Street Row Houses too. Once I assembled one of the three homes, I thought to place them on some foam to study the street scene. Then lightning struck, and the thought occurred to me to create a forced perspective scene with this residential street. Hemlock Street was born!

The problem condition; that area outside the curve and at the corner of the room.

    Forced perspective uses scale and compression to enhance the depth of a scene. Think of standing between the rails and looking at the horizon. Many modelers have placed a smaller scale structure in the background to achieve this effect. By placing the larger models in the front, and having the street extend to the backdrop uphill and get narrower where it meets the backdrop, it is possible to create the impression of distance in a small space. Initial experiments made this look like a winning strategy.

A preliminary mock-up, with the wedge-shaped street and preliminary building placement.

    The street is a key part of the deception. The valuation map indicated the streets were 70 feet wide, which seemed wide. So I made the street 25’ in S scale at the front, and the same width in N scale at the rear of the scene. I angled the street a bit to the left, and created a crest a few inches in front of the backdrop to hide the joint.
To be continued....
Keith Hayes
Leadville in Sn3