Saturday, August 30, 2014
Thursday, August 28, 2014
Colorado Central Maintenance Of Way Car #026552 | 5 Comments - Click Here :
Columnist Lincoln Pin joins the blog with a fine article about his CC MOW build.
Welcome aboard Link!

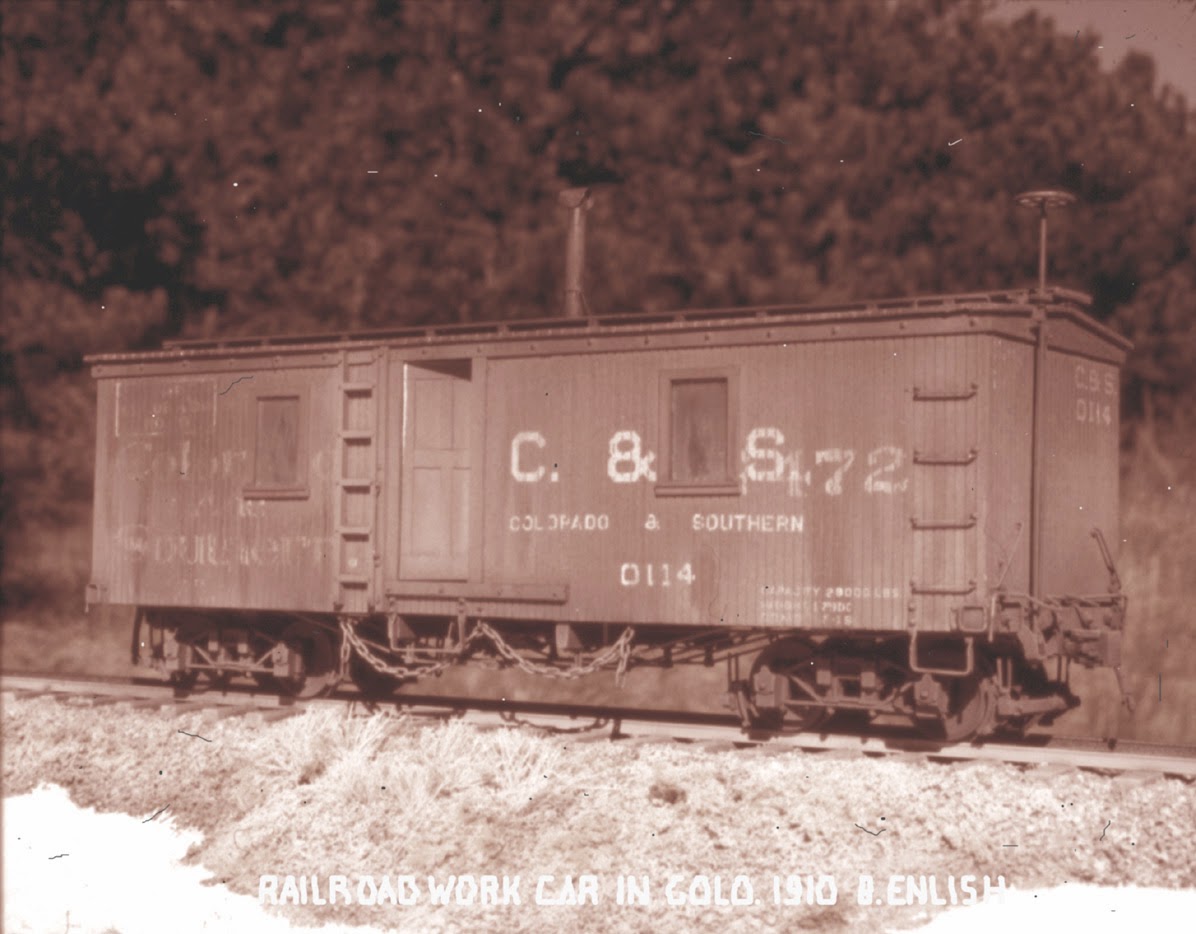
Lincoln Pin - In 1883, the narrow gauge Greeley, Salt Lake & Pacific Railroad pushed into the mountains west of Boulder, Colorado to tap the mineral riches of the region. The line never owned its own equipment but leased narrow gauge equipment from the Denver, South Park & Pacific and from the Colorado Central Railroads. Numerous excellent photographs of the line were exposed by the noted Colorado photographer Joseph "Rocky Mountain Joe" Sturtevant capturing excellent portraits of leased South Park and Colorado Central narrow gauge locomotives and rolling stock. These photographs are in the collections of the Denver Public Library and the Boulder Library. Colorado Central Maintenance of Way car #026552 is featured in many of these wonderful Sturtevant photographs functioning as a head end car on both mixed freight and passenger trains. The best published collection of these photographs can be found in Forrest Crossen's book "The Switzerland Trail of America".
Welcome aboard Link!
Lincoln Pin - In 1883, the narrow gauge Greeley, Salt Lake & Pacific Railroad pushed into the mountains west of Boulder, Colorado to tap the mineral riches of the region. The line never owned its own equipment but leased narrow gauge equipment from the Denver, South Park & Pacific and from the Colorado Central Railroads. Numerous excellent photographs of the line were exposed by the noted Colorado photographer Joseph "Rocky Mountain Joe" Sturtevant capturing excellent portraits of leased South Park and Colorado Central narrow gauge locomotives and rolling stock. These photographs are in the collections of the Denver Public Library and the Boulder Library. Colorado Central Maintenance of Way car #026552 is featured in many of these wonderful Sturtevant photographs functioning as a head end car on both mixed freight and passenger trains. The best published collection of these photographs can be found in Forrest Crossen's book "The Switzerland Trail of America".


These great photographs of G,SL&P operations are a gold
mine for those interested in c. 1890 Colorado Central freight equipment. I have
always loved the photograph of C.C. #026552 in Boulder Canyon as a head end
car. When The Leadville Shops offered a kit of #026552 in On3 I built one, as
well as several of the Colorado Central c. 1880 (Union Pacific) boxcars once
offered by the Leadville Shops. These 24 ft. narrow gauge cars are perfect for
my On3 empire.
Little is known of the fate of C.C. #026552, or the other
24ft boxcars that once rode the Colorado Central narrow gauge lines. However,
some certainly were converted to MOW service. I am also working on some kit
bashing of this kit into other South Park and C&S MOW cars.


My model uses Coronado Scale Models brass trucks with PSC
metal wheel sets and Kadee couplers. While tempted to use link and pin
couplers, the Kadee’s allow better operation. Of note, I sealed the wood of the
model with Testers “Dull Coat” to give the laser cut wood surface a smooth
look. I used enamel paints (Floquil) on this model as I have found that water
based paint applied directly to the wood raises the wood grain in an
unrealistic manner. After painting, I colored each side board with Prisma-Color
Pencils and then over sprayed with a dilute wash of freight car red.
I photographed the model using my Nikon D600 camera and used
the Helicon focus correction program to eliminate depth of field blurring.
Respectively Submitted,
Lincoln Pin


Tuesday, August 26, 2014
David Steer’s South Park Stockcar | 3 Comments - Click Here :
 |
| David Steer Photograph |
Derrell Poole - The photos presented here are the work of David Steer,
built from an On3 version of the Leadville Shop’s new Denver South Park &
Pacific / Colorado Central / and other UP subsidiary - Kansas Central, Utah
Northern stock cars. The Company also
offers an S scale version of this car. David is a good friend of mine and a close friend of Bill
Meredith of the Leadville Shops. David and Bill both live in the Ottawa area of
Quebec. David is an award winning modeler so it is with great pleasure that I
share his experiences with this kit. I contacted David by email after Bill sent
me photos of his finished car. I hope you enjoy our exchange and David’s
insightfuly responses.
Derrell – David, your model is great! This is a car rarely
photographed and to have a model of it to examine is very revealing - a study
in history. Not to mention your wonderful craftsmanship! I think you
demonstrate what one can do with a Leadville Shops kit quite nicely! If I may
ask, what was the feature of the kit you enjoyed the most?
David - Just having a kit for the rare stockcar
was really the biggest feature. D.,S.P.&P. stockcars are as “scarce as
hen’s teeth”. There being but two published photos that I know of. Both photos
showing a stockcar in a train with loco 112 in the Platte Canyon. See the pp216
and 221 of Mal Ferrell’s book “The South Park Line”. The kit’s instructions
provide helpful notes (provided by Derrell Poole) detailing the history of the
cars on the South Park and the Colorado Central. They were scarce on the South
Park with only about 8 or 9 being recorded as operated. Just for fun, I often
speculate that the stock cars were perhaps used most for the transport of
horses, either accompanying their owners riding in the passenger cars or as
stock for freight wagons or in the mines. An accompanying stock car might be a
nice switching detail for an operating model layout.
Some might think of hens as
having two teeth, the upper and lower beak, and so being as scarce as the two
known photos of South Park stockcars.
 |
| David Steer Photograph |
Derrell – I have the Sn3 versions of the two kits you’ve
shared and I get excited just examining them – in fact, I’m working on the
reefer right now. I have trouble building anything straight out of the box and
I am going to modernize the car as a C&S rebuild. Was there anything you
took your liberties with about your kit? Did you do some discretionary
modifying?
David - Generally I followed the instructions as I
wanted a car more or less as-built for the railroad. I did deviate from the
instructions a bit in the order of assembly and on the stockcar I reconfigured
the brake system to what I thought would be more appropriate for the as-built
cars. The car kit is quite complete and goes together without any difficulty. I
enjoyed building the kit and was pleased with the results. It is fun to
assemble, as everything fits very well. Any comments below should not be
considered critical or indicate dissatisfaction with the kit. They are but
observations based on my idiosyncratic model building methods and the limits of
the tools I have.
In building, I completed
the sides, ends and under-frame more or less completely before assembling them
into the car body. On the stock car there are literally several hundred NBWs to
install and this took me many hours of drilling and fitting. For these, I
drilled each hole through the post and the side boards and then inserted the
NBW casting with the shaft all the way through and glued from the inside. Thus
the side posts and the boards are pinned together and this may help to keep the
self-stick adhesive for these parts from separating over time. After the glue
had set, the inside boards were filed smooth. Once all the NBWs were in place
the model felt like a porcupine with the bolts protruding into my fingers when
I handled it. One of the photos shows the body and frame assembled with the
roof beams in place for the stockcar. The construction mirrors that of the
prototype and so there really is “interior detailing”.
For the brake system, the
double floating lever arrangement braced to the cylinder as shown in the plan
seemed to me to be too modern for these D.,S.P. & P. era cars. So, on the
stockcar, I carved the lever mounting brackets off the Grandt New York brake
cylinder/tank and mounted it close to the car centerline. The brake rods were
then connected using one floating lever on the cylinder and the second lever
braced with a bracket on the frame. This seems to me to be a more typical
arrangement for this era. The Grandt Westinghouse narrow gauge cylinder/tank is
too long to fit between the queen-post beams on these short cars. One of the
photos shows this arrangement. I also changed the brake wheel from the supplied
Grandt casting that has a double rim, to a simpler one with a single rim as this
seemed more appropriate for the early era.
On the stockcar I also
added chains from the frame to the brake-beams on the trucks. Small “J-hooks”
of soft copper wire were glued into holes in the frame. The holes for the
hangers on the brass brake shoes/beams were drilled through. After the car was
painted, four links of 14-link/inch chain was hung from the J-hook by bending
it gently to fit the chain to the floor, and tying the other end to a bit of
fine wire threaded through the holes in the brake shoe hangers. These chains
help to fill-in the space around the trucks under these cars. I must apologize
to the scale modelers however, as this is not a correct arrangement. In reality
the brake shoes were hung from rods attached to the floor beams and the chains
hung from the floor beams to the brake beams. The rods kept the shoes aligned
with the wheels and the chains kept the brake beam from falling on the track
and derailing the car if the beam broke in service. So, the model is not up to
FRA standards, but it looks better to me than nothing at all. On a model, such
details involving moving parts are a compromise between accuracy and having
something that is flexible enough to operate on the layout.
I chose to install the
Kadee On3 couplers using their boxes rather than using the wooden components
suggested in the kit’s instructions. I have found over the years that the most
reliable coupler operation comes from always using the supplied Kadee draft
boxes (with a few exceptions). See comments below on the choice not to use
link-and-pin couplers.
 |
| David Steer Photograph |
Derrell – naturally we all want to know the basic details
like what colors you used to paint the car – did you paint inside the car? How
much fun were the decals to use and whose trucks did you put on it. In fact I’m
curious to know what kind of glue you used–wooden kits seem to have a lot more
options in this regard. Robert Stears uses ACC for instance. I’ve thought of
using epoxy. What is your preferred choice?
David - Painting one of
these models is a multistep process that is best integrated with the building.
Yes, I painted the inside of the car using a brush and Tamiya light brown
before the roof was added. The inside of the roof was left unpainted as I
couldn’t reach it once it was glued on. The under-frame/floor was airbrush
painted, before the detail parts were added, with Floquil “roof brown”. One of
the photos shows the painted under-frame with the unpainted hardware and rods.
After the under-frame details and rods were added these were brush painted with
Tamiya black. The sides and roof were airbrush painted with Floquil “boxcar
red” to which some “glaze” had been added to give a more glossy finish for
decaling. This turned out to be a bit dark for my taste, and “oxide red” might
have been a better choice.
For assembly, I used two
types of glue – Weldbond white glue and ACC for wood and leather. The Weldbond
is like a white glue, but it dries a bit soft. It was used for all the
wood-to-wood joints. It sets in a few minutes, although it takes overnight to
set completely. For wood-plastic or metal joints I used an ACC that has a bit
of filler so it is not runny, but will still flow into joints. It will fill in
around plastic parts in holes in the wood, as well as for metal to metal parts
in the brake system or to attach metal parts to the wood body. I haven’t had
much luck with epoxy for models like this as I find it too difficult to get
into place without dribbling out-of-place.
The trucks are the brass
Coronado DSP&P Type B (I think?) with the brake beams and the Grandt
wheels. These are beautiful casting but they do take some time to assemble. I
like the Grandt wheels as they have ribbed backs and some foundry detail cast
on the faces. However I have no idea if they are appropriate for the early South
Park Cars. They do say Griffin Foundry Denver on the face and D&RG on the
back. I have no idea if the Griffin foundry in Denver was even open in the
early 1880’s or if it provided wheels to the South Park. Almost certainly if
they did, the wheels weren’t labeled D&RG when initially installed. But
they look nice on the model even if they are not quite right for uninvited
guests with magnifying eyes.
I used the Decals that came
with the kit. They went on fine and were as much “fun” as any decals I have
used. After the car was complete and painted and had dried, it was airbrushed
with a coat of ModelMaster gloss from the bottle. When that had dried
(overnight), the decals were applied. I trim the decals as close as possible to
the lettering and after soaking in water these are slid on to the model into an
area wetted with the MicroScale red solvent. They are then recoated with
solvent at intervals until the film has almost disappeared. If any bubbles
appear they should be pricked or slit and more solvent applied until they
settle in place. This may take several hours. After drying overnight the area
around the decals is washed with water using a Q-Tip and dried. After drying
again overnight, a final coat of ModelMaster semi-gloss is applied. Sometimes I
make this a bit flatter by adding some flat to the semi-gloss. Now the model is
ready for weathering (which I haven’t done yet).
 |
| David Steer Photograph |
Derrell – If I understand correctly
you don’t actually have a layout. Yet you used Kadee couplers instead of Link
and Pin couplers. This would suggest you intend to operate the car? Is this
true and what might be your plans for that?
David - Yes, I don’t
technically have a “layout” (for On3) although there is some 20 feet of track
and switches with a mine and a few buildings under construction. Most of the
other rolling stock does compromise with the Kadee couplers as they are
practical and work very well. I did do one South Park car with link-and-pin
couplers from Coronado as shown in the attached photo of an earlier resin kit
for a D.,S.P. &P. boxcar. Some experience with chain link couplers on
European models has taught me that, they are while super realistic and
beautiful, they are too finicky for anything but round-and-round operations.
Hence the practical choice of Kadee for these models.
Derrell – Thanks for sharing your
thoughts and experience. We've already seen your work featured on this Blog and
I sure hope we see more of it in the future. Great job!
 |
| David Steer Photograph |
Below is a list of the kits offered by The Leadville Shops. They will also be at the NNGC in Kansas City next month.
O scale kits
$75 each:
(all kits less
trucks and couplers)
LSO-1 DSP&P/CC 26’ Stock car
LSO-2 DSP&P/DL&G 27’ Tiffany Reefer
LSO-3 D&RG/RGS/SRR 24’ Boxcar (September availability)
LSO-5 CC 24’ Boxcar #4 (contact for availability, very
limited numbers)
LSO-5 CC 24’ Boxcar #1620 (Sold out)
LSO-5 CC MOW/caboose #26552 (contact for availability, very
limited numbers)
S scale kits $60 each:
(all kits less trucks and couplers)
LSS-1 DSP&P/CC 26’ Stock car
LSS-2 DSP&P/DL&G 27’ Tiffany Reefer
LSS-3 D&RG/RGS/SRR 24’ Boxcar (September availability)
S scale kits $65 each:
(all kits less trucks and couplers)
LSS-5 CC 24’ Boxcar #4 (contact for availability, very
limited numbers)
LSS-5 CC 24’ Boxcar #1620 (contact for availability, very limited
numbers)
LSS-5 CC MOW/caboose #26552 (contact for availability, very
limited numbers)
S scale Trucks
(Trucks come with Berlyn Wheel sets)
Union Pacific Type A – 25.00pr. (Litchfield 10 ton type for
the Stockcar)
Union Pacific Type B – 25.00pr. (UP S.B. 12 ton type for the
Refrigerator)
D&RG 10 ton – 25.00pr.
Contact
The Leadville Shops:
Email doug@theleadvilleshops.com
phone (720) 213-4758
Paypal payments to djunda@pdtnetworks.org
phone (720) 213-4758
Paypal payments to djunda@pdtnetworks.org
Please allow
sufficient time for shipping – they are filling orders as fast as they can
dependant upon receipt of parts needed in the kits, as well as trying to
prepare for Kansas City not to mention managing day jobs of their own. Thanks!
 |
| The Cimarron Works 27 foot boxcar (Resin Kit) with Link and Pin couplers. |
Monday, August 25, 2014
Hemlock Street Part 5 - The Mine | 0 Comments - Click Here :
 |
| Denver Public Library |
Keith Hayes - Remember I had gotten Four-Fingered Tony’s from Bar-Mills and used all the grocery parts for Carleno’s Grocery? Well, the model parts sat on my bench for a while and I got to thinking it had the makings of a mine. Back behind Hemlock Street I have a couple drain pipes that need hiding. Leadville slopes up to the mines east of town, and the Penrose mine can be seen south of the Leadville Depot in the title photograph (the Penrose will be the subject of a future model.). I thought of adding an HO mine on a hillside of tailings to contribute to the forced-perspective scene.
Due to the elevation, low temperatures and snow, Leadville
mines feature head frames that are fully sheathed, usually with a lower gable
below and a higher roof surrounding the head frame. Tony’s has two pieces, a low
shed and a slightly larger gabled building. I figured by adding a short tower
to Tony’s, I would have the form. The kit is an ‘L’ shape in plan, and I would
have liked the inside corner to face the front of the layout, but it was not to
be. Likewise I would like to have kept
the wood siding, but by the 30s, all the working mines were covered in
corrugated metal.
For this project, I ordered corrugated metal from Wild West.
This is a nice product with a silver finish; I followed the tips and sprayed
the strips of material with several colors of brown and rust. (Be sure to paint
more than you need and account for laps—I did not and had to paint a second
batch.) Next I cut the strips into eight foot lengths, and glued this to the
wood substrate, work from the bottom up, and one side to the other.
Once again, a Grandt kit solved a problem for me. The
Wentamuck Mine has a slew of great parts, including a couple structures, log
cribbing, mine track and ore cars. There is also a small head frame I may use
elsewhere on the layout in the future. I called Grandt and also ordered some
extra cribbing and track, which yielded a second ore car. I cut some foam to
form the tailing piles, and pieced together the cribbing to hold it in place.
What is great about this cribbing is that the castings have realistic
dead-men (the logs that extend back into the hill to hold the wall into place).
The foam was painted with tan latex paint, into which I sprinkled sand. Last I
covered the surface in sifted tailings. Studying photos of cribbing, note that
water leaches the minerals out of the rock and across the timbers, so be sure
to add some stains of yellow and red to cribbing.
I used the track to layout some trestles to distribute the
tailings. These were built up from styrene stock, and I glued the track to the
top. The assembly got painted with the tan camo paint and then detailed with
washes of craft paint.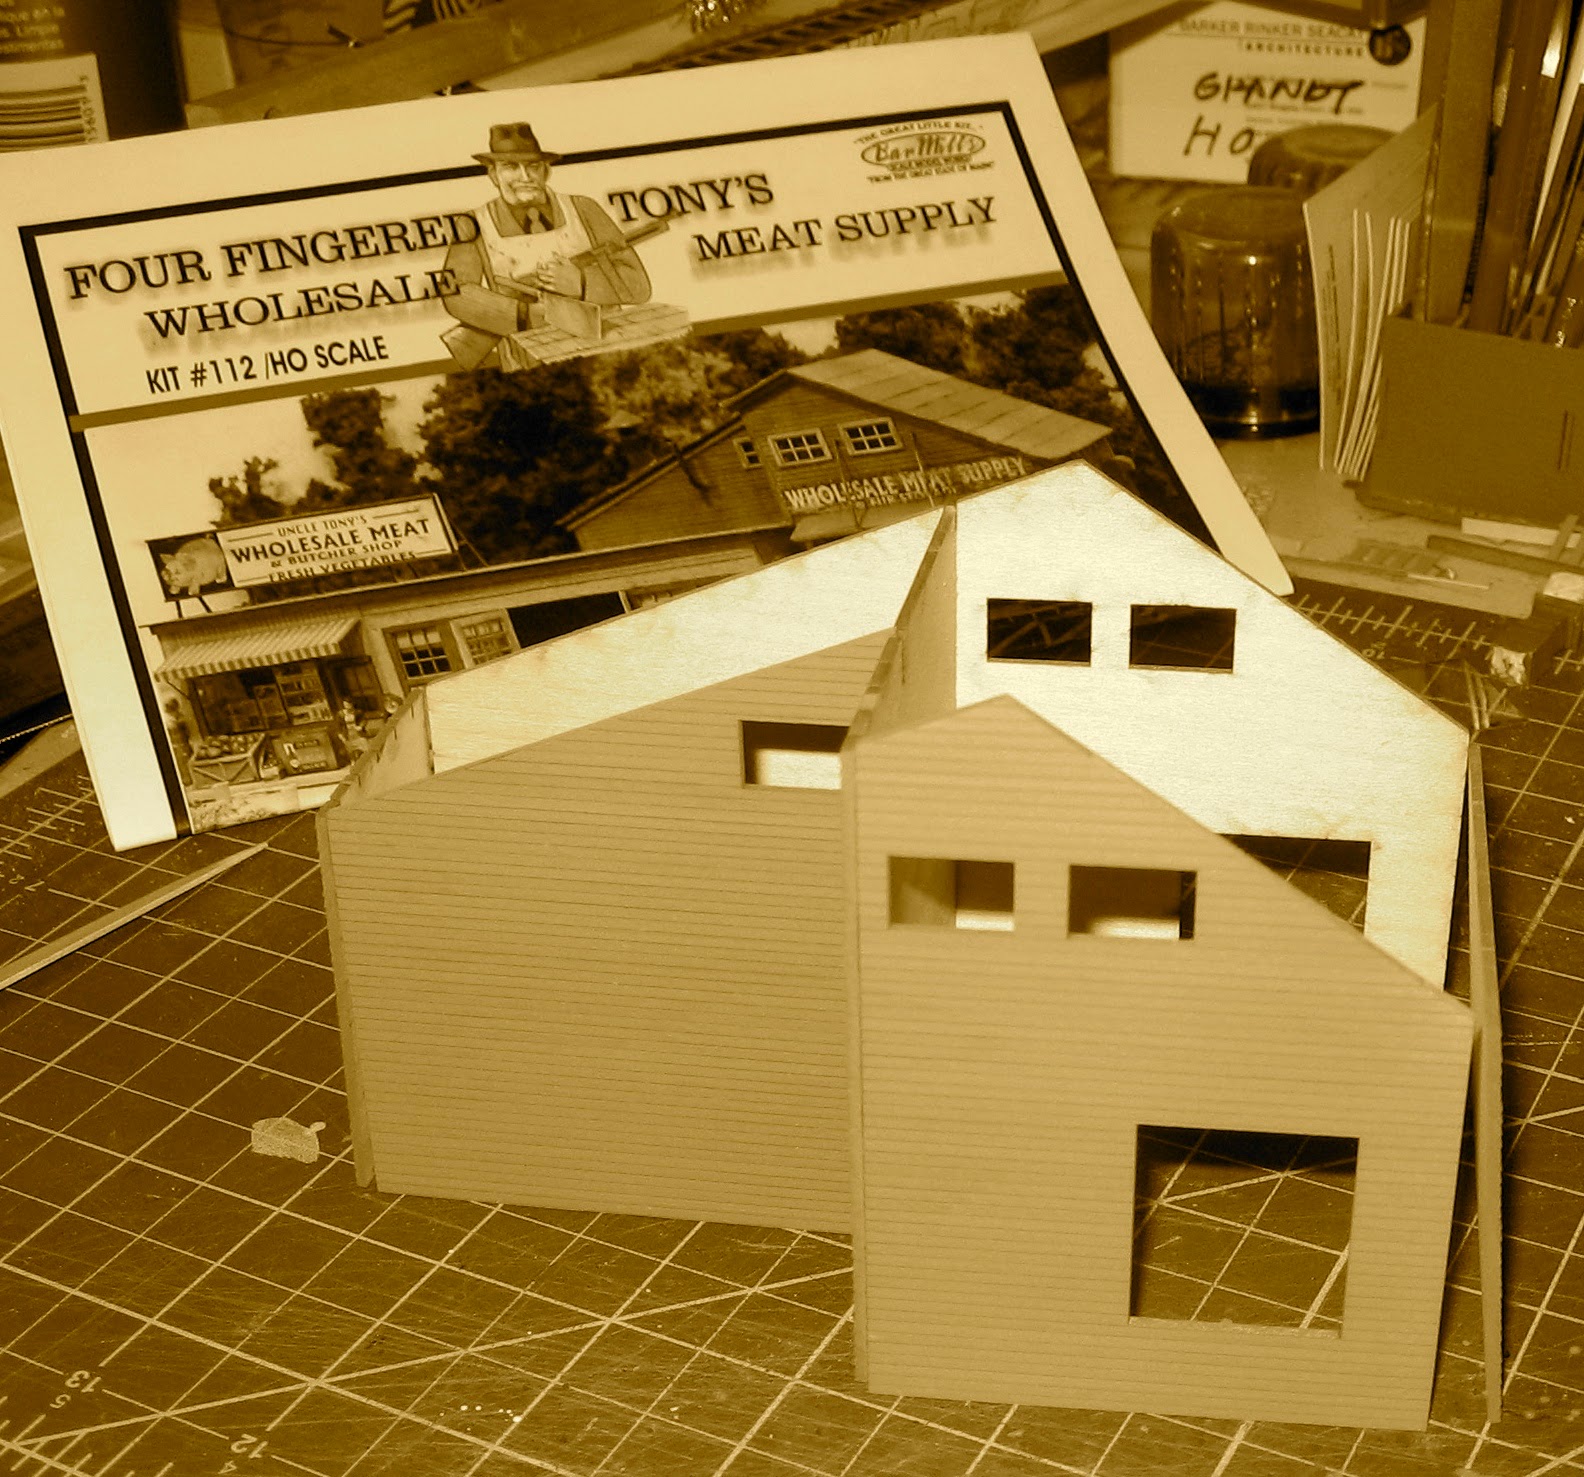 |
This is the basic Bar Mills kit mocked up on my work bench.
The building has a nice form and could also make a neat grain elevator. The
notch fit nicely around the drain pipe, so I had to accept that this side would
face the backdrop. Industrial buildings are simple, as they want to spend them
money on the equipment inside, not fancy architecture.
|
 |
The mine has been assembled, and I added a styrene box on
top to conceal the head works of the elevator. The wood frame to the right will
become the exterior portion of the head frame. I primed the wood with a
Rustoleum gray to seal it, and followed with a coat of my favorite camouflage
tan. The spots of white were brushed on in anticipation that I would install
the corrugated metal with some rough edges and let the inner siding peek
through. I did not do this in the end. I glued the metal siding on with white
glue (it is really a paper product).
|
 |
Here is the mine in place. I built the trestles from
styrene. The tipple is an Anvil Mountain Models kit. There are images in The
Mineral Belt of the Coronado Mine, which Brother d reports had a contract with
the C&S to dispose of mine tailings as fill and rip rap (the Coronado was
literally in the city and had limited space for tailings.) The mine car, track
and small buildings are parts from the Grandt Wentamuck Mine. The lettering is
dry transfer, and I added some streaks with white water color pencil.
|
 |
This is the scene today. I used the other part of the Bar
Mills kit as a warehouse/ loading dock. The cribbing is from the Grandt
Wentamuck mine and has been colored with yellows, tans and white to simulate
staining from the tailings pile. The miners need a way to get from the track
level to the mine, so stair will be placed in front of the tipple. Some HO
figures up on the trestles will complete the scene.
|
Keith Hayes
Leadville in Sn3
Saturday, August 23, 2014

Monday, August 18, 2014
C&S Chalk Creek Branch | 15 Comments - Click Here :

Darel,
Your C&Sn3 blog is great. The topics covered by the contributors have increased my C&S and modeling knowledge. I am working on an On3 layout of the C&S Chalk Creek Branch after 1915.
Here (below) are a series of pictures my friend and fellow
modeler Bob Boorman took prior to his moving to Texas earlier this summer.
If Roper believes any of the pictures
have merit, and are appropriate for inclusion in your
blog, please use them.
Keep on modeling!
Randy Rieck


Saturday, August 16, 2014

Thursday, August 14, 2014
Steam Era Freight Cars Blog | 15 Comments - Click Here :

Narrow or standard gauge, I'm always interested in early freight car construction. Marty McGuirk is reviving (updating) the Steam Era Freight Cars blog. Though standard gauge oriented, the construction techniques were/are the same.
Like this blog, he offers prototype modelers the opportunity to contribute with blog posts of their own. You can follow along here:
a.jpg) |
| 1:64 Model by Doug Heitkamp |
Subscribe to:
Posts
(
Atom
)