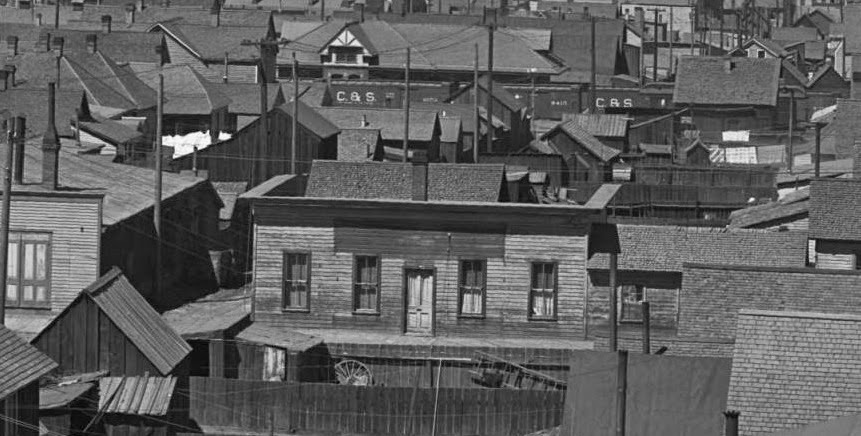
Keith Hayes - A side benefit of this scene was the opportunity to build some neat laser cut kits in HO and N scale. So, back to the hobby shop in search of appropriate kits. I found a couple small home kits and neat industries from LaserKit and Bar Mills. I started building models and mocking them up along the street to see what worked. I already had a Banta Silver Plume Bakery kit. The prototype bakery is on a corner, and has a great false front with a complicated cornice. This kit was to anchor one corner. For the opposite corner, I went back to the photo—there was a great, simple commercial building right there in the middle screaming to be modeled.
The building form was simple, and Grandt had a number of
castings that fit the bill. I used Evergreen styrene lap siding to make the
front, side and rear. The cornice is built up from strip stock and dowel. I was
pondering how to build the walk in front of the building, and I spotted a web
article published by Tom Troughton. Tom recommended building loading docks on a
piece of hardboard. You drill holes for the posts, and glue stripwood to the
top—perfect!
The building in the photo has no sign to indicate its use,
though it has a large black patch above the door for a sign. A grocery seemed
the ticket at the end of the residential street, and extending the platform to
the track provided a nice opportunity for rail service. Bar Mills has a neat
kit, Four-Fingered Tony’s, which provided the window signs, and many castings
to fill out the platform with vegetables. Our friend Tom Carleno obliged us with
his name and Carleno’s Grocery was complete.
 |
Laying out the front wall using Evergreen lap siding and
Grandt Line windows. Being in the foreground, this building is built full scale; 1:64.
|
 |
I use spare parts as gussets to square the inside corners.
There is a large door on the track side. The rear wall faces away from the
viewer, so there was no need to add any openings. It will be on the lot line
anyway.
|
 |
I did not enlarge the prototype image much, but it seemed like the
building had a nice cornice. You could see the inside face of one side of the
parapet, so I added lap siding there, and a wide piece of styrene as a cap. I
added a tall vertical leg, then a piece of rod and a smaller piece below that:
the whole bunch creates a satisfying effect. Some Squadron putty fills the
holes.
|
 |
The building in the photo does not have a sign, but there is
a black panel where one was painted. I painted the siding yellow with a nice
green trim. I masked patch and painted it black for the sign. I looked all
through the letter decal sets at Caboose Hobbies one day, and settled on this Gothic
font (one challenge in larger scales, is the lack of large fonts for signs like
this). I used my computer to layout the sign spacing, and taped this on the
building for reference.
|
 |
If you look closely at the McClure photo, you will see all
the buildings have a stain at the bottom three feet of the walls. I suspect
this is due to long winters and melting snow setting against the bottom of the
buildings. Some charcoal rubbed on the bottom of the building duplicated the
effect nicely. This image also shows the deck I built following Tom Troughton's
tips; more on that another time.
|
Keith Hayes
Modeling Leadville in Sn3
A little off the subject-but not far-you've got to see this Youtube video.Not to long ago Darel brought up the subject of backdrops for the Dickey layout-this looks like a good solution on anybody's layout.The video deals with computer generated backdrops and was done in cooperation with Model Railroad Hobbyist online magazine.It explained a little about how they are made and had some good scenes on the layout of the man who presented the video.Go to Youtube and type in:COMPUTER GENERATED BACKDROPS/MODEL TRAIN BACKDROPS/MODEL RAILROAD HOBBYIST/MRH
ReplyDeleteRobert:
ReplyDeleteThanks for the tip. I saw this in MRH the last month or two. I myself plan to follow Dale Krutzer's method. My Dad and I paid a special visit to Leadville earlier in the summer to make some panoramas for my backdrops. These will be pieced together in PhotoShop, printed on wallpaper paper, and adhered to the wall. One of my challenges is that the viewer looks east, uphill towards the Mosquito Range rather than facing west towards the more dramatic view of Mounts Massive and Elbert.
One issue is that my photos are circa 2014 (right before noon), and my layout is set in the 1930s, the key difference being the abundance of trees on Carbonate and Fryer Hill, not to mention Poverty Flat. I am also thinking about what to do in the streets where they meet the backdrop. This will be less an issue on Hemlock Street than on the numbered streets.
Since we are off the subject, I wonder if Darel would indulge us in some other blow-ups of the Beam photo and show off the fresh block lettering on the boxes and coals on the depot lead?
All the best,
Keith Hayes
Leadville in Sn3
Looking very nice Keith. As for your question about what to do where the streets meet the backdrop, I have always found that to be one of the weakest points in many of the layouts that I have seen. The solution was discovered (or perhaps just publicized?) by a professional layout builder in Germany named Josef Brandl. His trick is to place a crest a few inches away from the back of the real scenery (so the back edge is not visible), then to leave a gap between that back edge and the backdrop. That way when you - the viewer - move, the relationship between the back of the 3D scenery and the backdrop changes as well. This is spectacularly realistic, and I think that you could do the Mosquito Range very well with the technique. The best photos of a layout using the trick are in a book/magazine about a layout set in an Alpine landscape in Norway. A few sample images here: https://shop.vgbahn.info/eisenbahn-journal/news/Meisterlich+umgesetzt+von+Josef+Brandl_167.html Again, the trick is to leave a gap between the back edge of the scenery and the backdrop. Keep up the great work.
DeleteAdrian Hundhausen
Thanks for the tip, Adrian, I will check out the link.
DeleteI used a similar ruse on Hemlock Street--the crest is a couple inches before the street meets the backdrop, and it only drops down 1/4"-3/8" beyond the crest at the intersection.
I have more of a challenge in the center of town. There I have S scale flats lining either side of the street and the point where the street meets the backdrop is quite obvious. I have given this some thought, and in one case I will distract the viewer with a scene of a truck unloading...beer (what else?). In the second case I think I will model a couple bicycles using 3d printing (more on that in another post) and feature a couple teens pushing their bikes downhill to the center of town. As with magic, I think the key is to distract the eye.
Thank you so much for your post!
Keith Hayes
Leadville in Sn3
Remember the before and after of one of the Montana photos that showed the same scene with and without RR tracks.Some of these scenes had been modified to meet the modelers needs.Couldn't some older photos be used as guides to modify newer photos.The video also mentioned something about topographic maps.
ReplyDeleteRobert, I really did not understand how the author in the MRH article used the topography to add depth to his photos. When I get some time, I will do some major PhotoShop work on my images to scrub out what I can. Erasing an entire forest is more than I care to take on, however: I just want the Mosquito Range in the background.
ReplyDeleteKeith Hayes
Leadville in Sn3